|
GUITAR FOR CRETINS, Part I
by Sam Sinister.
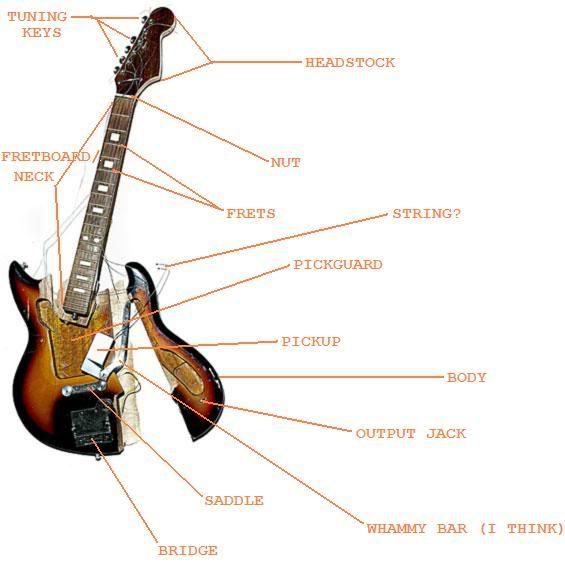
Alright. First thing's first. We'll go over the anatomy of the guitar. You can find this elsewhere on the
web, but if you're reading a "how to" on guitar playing, on a punk website, written by some jerkoff who calls himself Sam
Sinister, chances are you're a very lazy bastard. Okay then, here's a picture of a guitar with all it's naughty bits labelled:
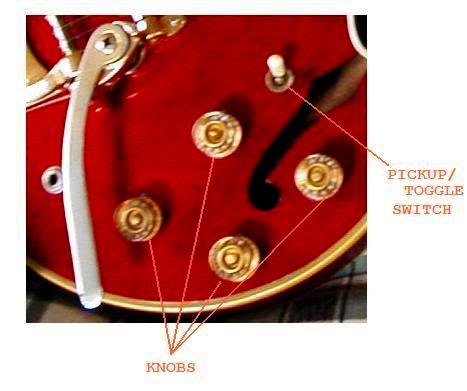 Your guitar should also have some weird knobs and one or more switches on it. The amount of knobs it has depends on the make
and model of your guitar, and how many pickups it has. Most guitars have 2 pickups. The one closer to the fretboard picks
up the higher frequencies, and the one by the saddle and bridge picks up the lows. There's usually 2 knobs; one for volume
and one for tone. Some guitars even have these same 2 knobs for each pickup (making that a total of 4 knobs). I've even
seen some guitars with 3 knobs, though I have no idea why. Hey, I never claimed to be an expert. Your guitar should also have some weird knobs and one or more switches on it. The amount of knobs it has depends on the make
and model of your guitar, and how many pickups it has. Most guitars have 2 pickups. The one closer to the fretboard picks
up the higher frequencies, and the one by the saddle and bridge picks up the lows. There's usually 2 knobs; one for volume
and one for tone. Some guitars even have these same 2 knobs for each pickup (making that a total of 4 knobs). I've even
seen some guitars with 3 knobs, though I have no idea why. Hey, I never claimed to be an expert.
The way you
have your knobs set will help you get your desired "sound". This, however, is only one factor. The rest depends on the EQ
settings on your amp, what kind of amp or "rig" (a large speaker cabinet, or "cab", and head unit) you have, the type of strings
you have on the guitar, and how well you can actually play (or fake being able to play). I'm probably gving you enough info
all at once to drive a sane person crazy and a crazy person crazier. Just see if you can get your hands on a small practice
amp for now.
The toggle switch lets you choose which pickup you want to use. The "up" position is the high pickup,
"down" is the low pickup, and the "middle" is for both pickups at the same time. Some guitars even have two switches. I
think the other one is just an on/off switch for the guitar's output jack. These guitars were obviously designed by goblins,
and should be burned, bagged, and dropped into the nearest body of water, as an example.
STRINGING YOUR GUITAR
Get some strings. Tell the guy at the counter you're new at guitar, let him know what kind of music you want to play,
and ask what kinda strings you should get. Also let him know what kind of budget you're working with. Ignore all smartass
comments and/or funny looks, and repeat your inquiry, if necessary.
Once that awkward process is over with, it's
time to string that bitch. Check to see if there's holes that go from the back of the guitar (the side that goes up against
your body) to the bridge. If there are, you have to feed the strings through the back first. If not, the bridge should have
holes that go straight through it on the front of the guitar. Feed the strings through the bridge. If you're holding the
guitar in a playing position, the order of the strings should go from the thickest string towards your head to thinnest towards
your feet. Make sense? Hope so, I don't know how else to explain it.
Now take the other end of the first string (throw the other strings off to one side. They're all on deck for
now) and feed it though the corresponding post on the headstock.
Turn the tuning key that contols that particular
post. As you turn it, you'll notice that the string gets tighter. WOW, this is FUN!!! Once the string is no longer like
a wet noodle made of metal, make sure it's set correctly on the nut and saddle. Both the nut and the saddle have their own
set of six notches, one notch for each string. Make sure the first string is set in the first notch on both of these. Otherwise,
you may be an idiot.
Finish tightening the string. Once it's pretty tight, stop. You don't wanna make it too
tight, since you might break it and you haven't even finished stringing your guitar, let alone played anything yet. We'll
worry about tuning it to the right note after all the strings are on.
Do the same thing with the remaining five
strings. Once that's done, take a break. You've earned it.
TUNING IT
I never learned how to
play guitar like a guitar player. I'm self-taught, and pretty much always do things my own way, so teaching myself guitar
was no exception. Some may call it "laziness", but I think "urgency" and "stubbornness" might be more accurate. Also, I
don't think there's a "right way" or "wrong way" to do anything, so long as the end result is the same. And, let's face it,
unless you're hell-bent on things like being able to play from tabs and sheet music, and doing intricate solos, playing punk
rock ain't all that hard to do. It's mostly simple power chord progressions. So I thought, Why learn finger positions for
chords, when punk music is almost exclusively power chords? I can tune my guitar to a power chord, and just use one finger!
So that's what I did.
I learned later that "Nu-metal" guitarists already did this, although I think their reason
was to get a lower, "heavier" guitar sound. These people call their tuning "drop D". I call mine "monkey tuning". Because
it's so easy a monkey can do it.
Monkey tuning differs from drop D tuning, in that 3 of the strings are tuned "up",
as opposed to
simply "dropping" the low E string to a D, which is all you do for drop D tuning. Monkey tuning is also
good for playing with other guitar players who use "standard" tuning (the tuning that most guitar players use), whereas most
people who tune down to drop D play with other guitar and bass players who use a similar tuning. It just limits confusion
when trying to match each other and teach each other riffs.
The standard tuning for guitar is E-A-D-G-B-e (the
small "e" signifies the higher, or thinner, E string, and differentiates between the two).
Monkey tuning is E-B-E-B-B-e.
The second and third B towards the end are the exact same note. You could also tune the second B (or the first of these
two particular B's) down to E instead (E-B-E-E-B-e), so as not to make it too tight and risk snapping it. I've also seen
a few people leave it as a G (E-B-E-G-B-e), so that they can still play standard solos on the 3 higher strings. I simply
take that string off of the guitar altogether. But the choice is yours.
NOTE: The remainder of my tutorial will
be based on the idea that you're on board with my tuning. So, if you want to learn how to play like a rock star, find a different
way. This is for people who want to play guitar RIGHT NOW. It's the simplest way to play, and probably the best way for
people who just want to learn the basics of punk rock song writing, typical punk riffs, rhythm guitar playing, and covers.
You're gonna need a tuner, unless you're one of those weirdos with "perfect pitch perception", which means you know
exactly what a note is from memory when you hear it. I have "relative pitch perception", which means I can match notes fairly
easily. This is also known as "playing by ear". In my opinion, having "perfect pitch" means you're a witch, and therefore
must be burned, bagged, and thrown into the nearest body of water. So, to avoid this, you should probably get yourself a
tuner and figure out how to use it.
Brand new strings need tuned about 80 times before they stay in tune. To
help fix this problem, grab ahold of each string, down by the saddle, and pull on it, sliding the whole way down the neck
of the guitar. Do this several times. This will help to loosen the string to the point where it will hold a tune the first
or second time you tune it. Once you've done this to all of the strings, tune it to monkey tuning.
RECOGNIZING
THE FRETS AS POWER CHORDS
Now that your guitar is all stringed-up, tuned, and ready to go, it's time to go over
the basics of playing. You won't need to learn any finger positions, we've already eliminated that step by "monkey tuning"
the guitar. What you're going to be playing, with just one finger, is fifth chords, or "power chords". A fifth chord is
made up of 2 or 3 notes: The root, the fifth, and an optional octave.
The root note is the lowest note in the chord,
and sets the tone of the chord itself. In other words, a power chord where the root note is a "B" will be a "B power chord".
In the tuning we're using, the root note will always be played on the low E string (please note that this string will always
be called the "low E string", no matter what chord we're playing, since it's still a "low E" when played without fretting).
The fifth note is actually the second note in a power chord. Nevermind why it's called a fifth, that's getting into
scales and theory, and it's just going to confuse you more than you need to be at this stage of the game. Just know that
it's called "the fifth", and that's where the "fifth chord" gets its name. This note will be played on the next string down,
which we'll call the "low B string". Your musician friends won't call it that, but they're using a different tuning. Don't
sweat it.
The octave note is optional, but makes the chord sound fuller and brighter. An octave is 12 notes higher
than a root. It's actually the same note, but a higher pitch. In other words, an octave higher than E is still an E. The
octave will be played, with that same finger, on the third string down, which we'll refer to as the "mid E string".
Once again, that's not what most guitarists call it, but for the purpose of this tutorial, that's what we're gonna call it.
You'll notice on the fret board there are some frets with a dot, and then on the 12th fret there are 2 dots. This
is the octave, and it coincides with the same notes as the strings being played without fretting (or "open strings"). All
the frets above that coincide with the frets below it, in the same order. So this means the 13th fret is an octave above
the 1st fret, the 14th an octave above the 2nd, and so on. Think of the neck of your guitar as having two separate fret boards;
one starting with the open strings, the other starting with the twelveth fret. Crazy yet? Good!!
Get some lettering
stickers from your local craft store, dollar store, or grocer's stationery section. Check around where they keep the scrapbooking
stuff. These are good to put on your fret board, so you know exactly what chords you're playing. Label them like this:
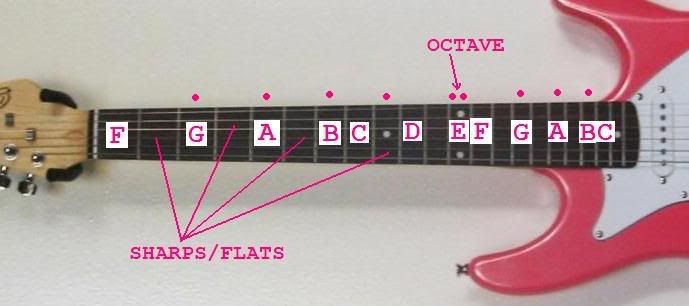
It might not seem right to you, but trust me, it is. You'll notice that some of the frets don't have letters.
These frets are the sharps and flats. On a piano, these are the black keys. Sharps and flats are the same thing, but what
you call them depends on what direction you're traveling on the fret board when you come to one. For instance, if you played
A, and then played one fret up from A, it would be called "A sharp". If you played that same fret after playing B, it would
be called "B flat". Sharp is up, flat is down. However you want to remember that is up to you.
You might also
notice that B and C are right next to each other, as are E and F. That's because there are no sharps/flats between B and
C, or E and F. No one knows why. That's just what the person who invented music decided when they designed musical instruments.
Deal with it.
PART TWO COMING SOON!!
|